New Year Resolution! (2012)
Happy New Year!
Let’s see if I can do this: this year’s resolution is to at least get some life into this blog. I’ll love to post more howto or interesting tutorials on how to do stuff, or just in general explore some topic.
Let’s see if this blog can become active again.
Again,
Happy New Year!
How to create a PPPoE Server on Ubuntu?
For one reason or another, I needed to setup a PPPoE Server on my Ubuntu machine. Unfortunately almost all the guides found were talking about setting a PPPoE client connected to a PPPoE Server. So I spend a few days testing and trying out different configurations, until I finally found how to set it up from scratch. The below instructions will look similar to the guide I referenced, but there are some extra steps to ensure that your connection will be able to access Internet properly.
Step #1: Topology Setup
First of all, the topology needs to be setup as followed:
PC --- PPPoE Server (Ubuntu) --- Internet
You can add your typical cable modem and/or router into the mix. The main issue here is to ensure that your PPPoE Server can access the Internet without any problems. To verify this, just do a quick ping test to google.com or yahoo.com.
> ping www.google.com
PING www.l.google.com (74.125.155.103) 56*84) bytes of data.
64 bytes from px-in-f103.1e100.net (74.125.155.103): icmp_req=1 ttl=52 time=36.9 ms
64 bytes from px-in-f103.1e100.net (74.125.155.103): icmp_req=2 ttl=52 time=37.5 ms
64 bytes from px-in-f103.1e100.net (74.125.155.103): icmp_req=3 ttl=52 time=34.3 ms
64 bytes from px-in-f103.1e100.net (74.125.155.103): icmp_req=4 ttl=52 time=37.6 ms
-- www.l.google.com ping statistics ---
4 packets transmitted, 4 received, 0% packet loss
If you cannot access this, check your interface. Most likely something is misconfigured there. There are several guides on how to enable your interface properly:
– Network Configuration
Step #2: Install PPP and RP-PPPoE
You will need to install these components to get the PPPoE Server working. The first one is simple: just grab the ppp package from Ubuntu:
> sudo apt-get install ppp
The second package (rp-pppoe) requires you to build it on your own. Start by grabbing the package from this website (Roaring Penguin)
 > wget http://www.roaringpenguin.com/files/download/rp-pppoe-3.10.tar.gz

> tar -zxf  rp-pppoe-3.10.tar.gz

> cd rp-pppoe-3.10/src

> ./configure

> make

> sudo make install
Step #3: Setup PPPoE Settings
Several files need to be created before we can start PPPoE Server. First, modify the /etc/ppp/pppoe-server-options and change it to the following:
/etc/ppp/pppoe-server-options:
# PPP options for the PPPoE Server
# LOC: GPL
#require-pap
require-chap
login
lcp-echo-interval 10
lcp-echo-failure 2
ms-dns 4.2.2.1
ms-dns 4.2.2.3
netmask 255.255.255.0
defaultroute
noipdefault
usepeerdns
Next, add a username into the correct secrets file. Since we’re using require-chap, we will add it into /etc/ppp/chap-secrets. The syntax is simple: follow the example below to add a user (alice) with a simple password (1234).
/etc/ppp/chap-secrets:
# Secrets for authentication using CHAP
# client              server   secret                 IP addresses
"alice"               *        "1234"                 172.32.50.2
One note: make sure that the file has the correct permissions. Sometimes the PPPoE Server won’t start if the file isn’t restricted enough. A simple chmod command will do here:
> sudo chmod 600 /etc/ppp/chap-secrets
Last of all, setup the IP addresses to lease for the PPPoE Server. We’re giving IP addresses 172.32.50.2 to 172.32.50.30:
/etc/ppp/ipaddress_pool:
172.32.50.2-30
Step #4: Set PPPoE Scripts
We are ready to start PPPoE Server. Several things to worry about: the firewall needs to be set properly so that the PPPoE Server will be able to transfer traffic from one interface to the other, and IP forwarding needs to be enabled. Since these options will have to set every time Ubuntu reboots, they’re part of the start PPPoE script. It’s placed under /etc/ppp/start_pppoe.
/etc/ppp/pppoe_start:
#!/bin/bash
##############################
# Simple script that starts PPPoE Server
##############################

# Enable IP Forwarding
echo 1 > /proc/sys/net/ipv4/ip_forward

# Start PPPoE Server
pppoe-server -C isp -L 172.32.50.1 -p /etc/ppp/ipaddress_pool -I eth1 -m 1412

# Set Firewall rules
iptables -t nat -F POSTROUTING
iptables -t nat -A POSTROUTING -o eth0 -j MASQUERADE
The -m option for pppoe-server is needed so that the packets don’t go beyond MTU size after the PPPoE header is attached.
For complete purposes, below is a stop script to nicely tear down the PPPoE Server and revert any changes.
/etc/ppp/pppoe_stop:
#!/bin/bash
##############################
# Simple script that stops PPPoE Server
##############################

# Disable IP Forwarding
echo 0 > /proc/sys/net/ipv4/ip_forward

# Kill PPPoE Server
killall pppoe-server
killall pppd

# Flush the IPtable rules.
iptables -t nat -F POSTROUTING
Step #5: Automatically start/stop PPPoE Server
All we have to do is add them into the /etc/network/interfaces so that once the computer boots and detects the interface is connected, it’ll boot up the PPPoE Server. The PPPoE Server resides in eth1 in this example below:
/etc/network/interfaces:
...
auto eth1
iface eth1 inet manual
post-up /etc/ppp/pppoe_start
post-down /etc/ppp/pppoe_stop
...
That’s it! Once that’s completed, then the PPPoE Server will boot up automatically and start handling traffic.
Troubleshooting
Usually, there’s always some sort of issue getting the PPPoE Server working. I found that using wireshark makes it easier to debug the situation. However, usually the interface (eth1) isn’t up for wireshark to sniff. Make the modifications below to bring up the interface without assigning an IP address to it:
/etc/network/interfaces:
...
auto eth1
iface eth1 inet manual
up ifconfig $IFACE 0.0.0.0 up
post-up /etc/ppp/pppoe_start
post-down /etc/ppp/pppoe_stop
down ifconfig $IFACE down
...
That should make it easier to debug.
References:
How to create a whitelist UAC for Windows 7?
(It’s been awhile!)
Strangely, with Windows 7 and Vista prompting the user for every program it doesn’t like, there seems to be no official method to create a whitelist: a list of programs that user always wants to run as administrator. I ran into this problem when upgrading to Win7, when I wanted to see real-time statistics of my CPU temperature. After researching a bit, there is an unofficial way to do this, so below are several techniques of how create a whitelist.
Option #1: Disable UAC Completely (not recommended)
One way is to just not deal with UAC and disable the whole thing. This is not recommended, but here are the instructions on how to do it, if you so choose to follow this route. Go to Action Center from Control Panel. From there, select ‘Change User Account Control Settings’.
![[Action Center]->[Change UAC]](https://poundcomment.files.wordpress.com/2011/03/action_center-change_uac3.png?w=595)
This will popup a window with a vertical slider. Adjust the slider to the bottom (lowest settings), and this will disable the UAC.
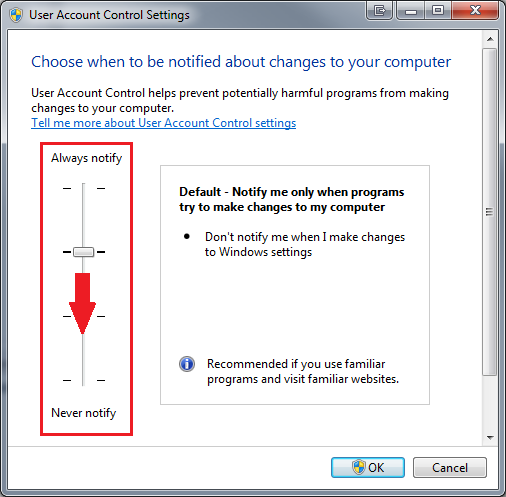
Again, I highly recommend against disabling this feature.
Option #2: Create a white list through Task Scheduler (Recommended)
There’s a small loophole in UAC: if you try to run an elevated task through Task Scheduler, it will not prompt the user for permission. This makes sense since if a task that runs in the background had to ask user permission, the computer couldn’t run well especially if tasks ran when user isn’t present. We’re going to use that loophole to create our white list.
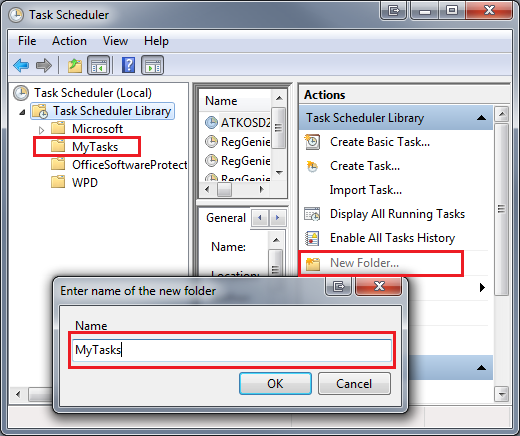
First, go to task scheduler (Type ‘task’ under Windows search bar), and create a folder. This will help organize your tasks, since you cannot move them when they’re created. In this case, we created a folder called ‘MyTasks’:
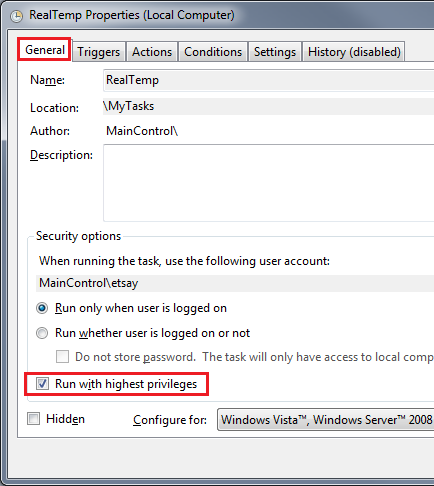
Once done, create a new task. Make sure that you select “Run with highest privileges” in the box.
Now go to the Action tab and create your own start application. In this case, we are creating a simple task to start RealTemp program, a nifty CPU monitor program.
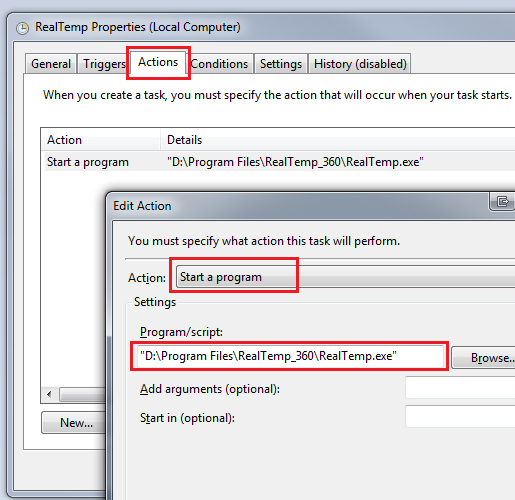
Save everything and exit out. We have created a task that we can run without needing any UAC prompting.
This is the first step. We want to run this at any given time, not setup a schedule to start this application. To do this, create a shortcut, and type in the following commands:
C:\Windows\System32\schtasks.exe /RUN /TN "<FOLDER>\<NAME_OF_TASK>"
In our little example above, it would be:
C:\Windows\System32\schtasks.exe /RUN /TN "myTasks\RealTemp"
Put this shortcut into the StartUp folder, and during bootup, the program will launch without any UAC prompt. You have finished creating a whitelist UAC!
(Full credit goes to MagicAndre1981, who had figured out how to create a shortcut on task schedulers)
Option #3: Create a whitelist UAC through a simple program called “Elevate Me”
There’s a nifty little script someone wrote that automatically takes task scheduler idea and automate so that you don’t need to go through the hoops on creating a task and a shortcut. He created a program (which he elevated through task scheduler) that will launch any program you want in elevated status. An interesting workaround, but he created a nice UI to simply elevate the program.
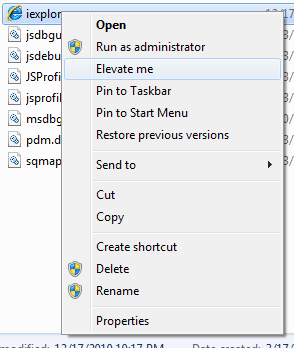
Download the application from here and install SkipUAC.zip. Once successfully installed, just select any target application and choose “Elevate Me” through right-click.
Note: did notice that my antivirus did not like this script. The author mentions in the comments that someone used the script to write a virus, which antivirus companies scan and labeled this particular code as malicious. For this reason I went with Option #2 to manually create your own shortcuts. Use this program at your own risk.
References:
Disable UAC: Disabling User Account Control (UAC) in Windows 7
Create TaskScheduler UAC: Create Whitelist UAC
Create shortcut for whitelist UAC: What’s a UAC?
Elevate ME script: Ignore UAC for specific programs
Back after 1 year MIA!
I recalled that last year I’ve posted in a blog for a brief time.
After wrestling the recovery password system on wordpress, I finally have access to this blog again.
It seems that even after a year of inactivity, my monitor CPU in terminal still has some life. It warms me to see that during my brief period I had contributed in something that people, at least, wanted to see. (For all I know, it could be that they looked and thought it was a horrible way to implement it and left)
In any case, let’s see if I can get this blog active again. I’ll try to get some interesting problems to solve, or neat little code snippets I’ve found.
How to do line substitution in files for linux routers?
In many situations, this is a trivial task: create a simple regex script in Perl (or Python), and execute it. However, with linux routers it becomes a bit tricky. Usually by default these routers do not have high-level scripting languages installed due to limited resources. It is possible to add them by extending the diskspace through external means (like USB or SD card), but generally unless the user needs to use scripts extensively it isn’t necessary. There are several means to do substitution here.
Method #1: sed substitution.
Sed substitution is the easiest method to do line substitution, and the most recommended method. However, the cryptic syntax is not very user-friendly, especially those unfamiliar to sed (yet familiar to generic regex). To do a simple substitution, use the following syntax:
# Syntax to do substitution in the file.

> sed -i 's/text1/text2/' file
This will take all instances of ‘text1’ and replaces it with ‘text2’ in the file. Note that the ‘-i’ means that it will change the file directly instead of printing the changes to stdout. This only does pure substitution, not line substitution. To do that, we need to use the ‘c\’ option instead of the ‘s’ option at the beginning of the string. See below:
# Syntax to do line substitution in the file, trying to match text1 with text2.

> sed -i '/text1/ c\ text2' file
Note that the ‘s’ in the beginning of the string is no longer there. There are actually several options in this same format. ‘i\’ will insert the line before the matched text1, and ‘a\’ will append the line after the matched text1.
In a practical example, openWRT tends to not setup the firewall (iptables) properly. When using the UI, it tends to comment out the option to include firewall.user. So I used this simple sed statement to uncomment the option whenever the firewall is changed:
# Uncomment out the etc/firewall.user

> sed -i '/option.*\/etc\/firewall.user/ c\ option path /etc/firewall.user' /etc/config/firewall
This will make:
/etc/config/firewall
...
# option path '/etc/firewall.user'
...
look like this:
/etc/config/firewall
...
 option path /etc/firewall.user
...
(A simplier way is to actually go to the source code and fix the issue, but this example is meant to show how this could be useful).
To understand more about how to use sed, see below references.
Method #2: awk substitution.
Another way to do substitution is to do it through awk. If sed seems cryptic, awk is even more so. Though the language is very powerful and there are many methods to accomplish this through awk, here is a simple example that does the line replacement:
# Replace line containing text1 with text2.

> awk '/text1/ {print "text2"; next} /.*/ print ;}' file > tmp.file

> mv tmp.file file
One disadvantage is that you can’t replace the file directly (since it seems to erase the file completely).
Some explanation over the awk syntax: AWK goes through a pattern-action routine. If /pattern/ matches, then {run action}. So if it matches /text1/, then it’ll {print “text2”}. The next means to skip to the next line, or otherwise it’ll continue to try to match against other patterns. The second pattern (/.*/) is there to match all the other lines, and print as normal.
So, using the above openWRT situation, an awk statement will look like this:
# Uncomment out the etc/firewall.user

>
awk '/option.*\/\etc\/firewall.user/ {print "option path /etc/firewall.user"; next} /.*/ {print ;}' /etc/config/firewall > tmp
> mv -f tmp /etc/config/firewall
More information about awk can be found in the references below.
Method #3: Perl substitution.
For those who really need to use Perl or just so happen to have it installed, here is how to do line substitution in Perl:
# Replace line containing text1 with text2.

> perl -pi -e 's/^.*test1.*/test2/' file
Like in sed, the -i means to edit directly into the file. The -p allows to read in file as input, and -e executes the commands the quotes. To run the openWRT example above, it would look something like this:
# Uncomment out the etc/firewall.user

>
perl -pi -e 's/.*option.*\/etc\/firewall.user.*/option path \/etc\/firewall.user/' /etc/config/firewall
Method #4: Python substitution.
This section will be added later once I have a better understanding of python. Unfortunately, the language is elusive to me, so there's room for improvement to understand how to work with this language.
References:
Sed: An Introduction and Tutorial
AWK: Find and Replace text
AWK: Manpage for awk(1)
Perl: Command-Line Options
Perl: Regular Expressions
How do you install/mount a new drive in Ubuntu?
These instructions focuses on Ubuntu, but it maybe possible to work on other distributions.
1. Physically install the drive into the machine (internally/externally).
Once this is done, use the following command:
# Scan the hardware, displays only disk class.

> sudo lshw -C disk
This will produce quite a few entries. Focus only on the ‘*-disk’ entries below to find the correct hardware (Note: only *-disk, not *-disk:0 or *-disk:1).
*-disk
 description: ATA Disk
 product: WDC WD2500JB-00G
 vendor: Western Digital
 physical id: 0
 bus info: scsi@0:0.0.0
 logical name: /dev/sda
 version: 08.0
 serial: WD-WCAL77000695
 size: 232GiB (250GB)
 capabilities: partitioned partitioned:dos
 configuration: ansiversion=5 signature=7b56ae05
After verifying that this is the correct disk (in this example, it’s the WD 250GB IDE disk), the item of interest is the logical name (e.g. /dev/sda).
2. Setup partitions
If there is no need to setup partitions/format the disk, skip the step #4.
Fdisk is the proper tool to create partitions on the disk. Type the following command, replacing the example with the correct logical name:
# Ready to format the disk

> sudo fdisk /dev/sda
This will bring up a menu with several options:
Command (m for help): m
Command action
 a   toggle a bootable flag
 b   edit bsd disklabel
 c   toggle the dos compatibility flag
 d   delete a partition
 l   list known partition types
 m   print this menu
 n   add a new partition
 o   create a new empty DOS partition table
 p   print the partition table
 q   quit without saving changes
 s   create a new empty Sun disklabel
 t   change a partition's system id
 u   change display/entry units
 v   verify the partition table
 w   write table to disk and exit
 x   extra functionality (experts only)
To create a new partition, press ‘n’. If you want the format the whole thing, it’s probably better to type ‘o’ first to erase the whole partition table.
Once n is selected, it’ll ask you for primary or extended partition. There can only be 4 partitions in a disk; this is a hardware limitation. Extended partitions is a workaround since through one extended partition multiple partitions can be created. For simplicity sake, create only one partition here (select p):
Command action
e   extended
p   primary partition (1-4)
> p
Follow through with the instruction, and select 1.
Partition number (1-4): 1
Now comes the cylinder information. This determines how big the disk should be. For simplicity, select the default values (it will try to choose the largest size possible)
First cylinder (1-30401, default 1):
Using default value 1
Last cylinder or +size or +sizeM or +sizeK (1-30401, default 30401):
Using default value 30401
The partition table is now created. To view the newly created partition, type ‘p’
Disk /dev/sda: 250.0 GB, 250059350016 bytes
255 heads, 63 sectors/track, 30401 cylinders
Units = cylinders of 16065 * 512 = 8225280 bytes
Disk identifier: 0x24b47c92

 Device Boot      Start         End      Blocks   Id  System
/dev/sda1               1       30401   244196001   83  Linux
Type ‘w’ to save the settings. (q to quit without saving changes)
The partition table has been altered!
3. Format disk
If there is no need for formatting the disk, skip to step #4.
‘mkfs’ is the command used for formatting. It is possible to choose a specific filesystem (ext2, ntfs, fat32, etc.) when formatting. For Ubuntu, ext3/2 is probably the best, though ntfs should be better if the disk shares with Windows.
# Formats the disk (mkfs -t <filesystem> <partition>)

> sudo mkfs -t ext3 /dev/sda1
4a. Mount the drive (manually)
The simpliest way to mount the drive is to use the ‘mount’ command:
# Mount drive (mount <partition> <mount folder>)

> sudo mount /dev/sda1 /backup
When done, unmount the drive using ‘umount’ command:
# Unmount the drive

> sudo umount /backup
Note: /backup needs to exist for the mount to work; otherwise, it will complain.
4b. Mount the drive (bootup)
Most likely, the manual option is useless for almost all situations, especially internal hard drives. Another method is to mount it during bootup time. For that, /etc/fstab needs to be editted. Ubuntu uses UUID instead of logical names to mount the drives (though logical names are certainly supported). This is slightly better, since it is possible for logical names to associate to different hardware if the system’s hardware changes. UUID sticks to its hardware and does not change.
To determine the UUID of a drive, type the following command:
# Find the UUID of the WD disk.

> sudo vol_id -u /dev/sda1

6486a213-45ad-2aa3-5c23-0d712a3465ds
Now, add that entry into the /etc/fstab file:
# /etc/fstab: static file system information.
#
# <file system> <mount point>   <type>  <options>       <dump>  <pass>
proc            /proc           proc    defaults        0       0
# /dev/sdc1
UUID=58a8346d-471a-4751-8fea-7456234bcdac /       ext3 defaults 0 1
# Backup media (IDE disk)
UUID=6486a213-45ad-2aa3-5c23-0d712a3465ds /backup ext3 defaults 0 1
When the system reboots, it should automatically mount the disk.
Note: the directory that the device is mounting to needs to exist for this to work. In this case, /backup had to be created manually first before it will mount. Otherwise, it will give an error and refuse to mount.
4c. Mount the drive (automatically)
The best way to mount a drive automatically other than bootup time is to still use /etc/fstab. If it’s a harddrive, the UUID method is still the best. However, each storage devices requires its UUID to be added into /etc/fstab, and this can become a tiresome hassle to do.
There are scripts to handle the auto-mounting (Ubuntu does a decent job if you brought the machine up to GUI level), but explaining it goes beyond the scope of this post.
References:
Installing New HardDrive
Using UUID
How to monitor CPU temperature through terminal prompt?
This is an interesting problem when setting up an Ubuntu server. The room that temporary contains the server is not well air-conditioned and as such temperature is a major concern. However, since the machine is headless, it is a bit harder to figure out the CPU temperature without needlessly looking at the sensor all day. Below is instructions on how to setup the CPU monitor on the prompt so it becomes a bit easier to determine whether the computer is overheating.
1. Install/Setup lm-sensors
This is a simple process for in Ubuntu (and probably most distributions). The command to install them is:
# Install lm-sensors to the machine.

>sudo apt-get install lm-sensors
Next, run the command ‘sensors-detect’ and go ahead and say YES to all the options. This is needed in order to detect any hardware sensors on the machine. Reboot afterwards.
# Setup sensors so they register properly.

>sudo sensors-detect
Now, verify that lm-sensors is setup correctly by typing ‘sensors.’ There should be some information about CPU temp/fans/voltage.
# Display sensor information.

>sensors

lm85b-i2c-0-2e

Adapter: SMBus I801 adapter at c400

V1.5:        +1.47 V  (min =  +0.00 V, max =  +3.32 V)

VCore:       +1.36 V  (min =  +0.00 V, max =  +2.99 V)

V3.3:        +3.39 V  (min =  +0.00 V, max =  +4.38 V)

V5:          +5.13 V  (min =  +0.00 V, max =  +6.64 V)

V12:        +12.31 V  (min =  +0.00 V, max = +15.94 V)

CPU_Fan:    2130 RPM  (min =    0 RPM)

fan2:          0 RPM  (min =    0 RPM)

fan3:          0 RPM  (min =    0 RPM)

fan4:       2712 RPM  (min =    0 RPM)

CPU Temp:    +40.0°C  (low  = -127.0°C, high = +127.0°C)

Board Temp:  +29.0°C  (low  = -127.0°C, high = +127.0°C)

Remote Temp: +29.0°C  (low  = -127.0°C, high = +127.0°C)

cpu0_vid:   +1.413 V
2. Write script to continually gather CPU temp.
This is a simple script that gets the CPU temperature out of the sensor data. It assumes that there is only one entry called ‘CPU Temp:’ Some systems may have more than one sensor that displays CPU Temp, so adjust the script accordingly.
cpu_temp.sh
#! /bin/bash
# Records the CPU temp and writes it to a temporary file.
while [ 1 ]; do
     sensors | grep "CPU Temp" | sed 's/.*:\s*+\(.*\)  .*(.*/\1/' >& \
     /tmp/.cpu_temp;
sleep 5;
done
Not particularly fond with this hack script, but it works. Currently, it is set to scan the temperature every 5 seconds, though this can easily be adjusted from the sleep command. Five seconds should be sufficient enough to keep the temperature up-to-date without using too many CPU resources.
3. Tie the CPU temperature to the terminal prompt.
Since Ubuntu uses bash as the default shell, the below changes are for bash prompt. To determine what shell is running, use the follow commands:
# Find which shell is running right now.

>echo $0
For bash, it is simple by modifying the following environment variable PS1. Since Ubuntu has some default setting on terminal prompt, I tack the CPU monitor along with Ubuntu’s defaults. Different shells will have to use similar techniques to set the prompt.
# Default Ubuntu settings
# PS1=${debian_chroot:+($debian_chroot)}\u@\h:\w\$ '
PS1='[`cat /tmp/.cpu_temp`] ${debian_chroot:+($debian_chroot)}\u@\h:\w\$ '
Put this under ~/.bashrc so that everytime a terminal is created, it’ll run this command (for other shells, it’ll be a similar rc file such as cshrc, tschrc, etc).
4. Have the script start during bootup.
One more step to go: the script needs to run in the background for this to work. Just manually starting it through “./cpu_temp.sh &” will not survive if the machine needs a reboot.
First, move the above cpu_temp.sh to /etc/cpu_temp/cpu_temp.sh. It is possible to change it to another place, but make sure to edit the below script. Add the following code to the /etc/init.d/cpu_temp.
/etc/init.d/cpu_temp
#!/bin/sh
#
# Simple script to enable/disable CPU temperature monitor.
PIDFILE="/var/run/cpu_temp.pid"
NAME="cpu_temp"
DAEMON="/etc/cpu_temp/$NAME.sh"

# Return 0, process already started.
# Return 1, start cpu_temp
do_start()
{
        if [ -f $PIDFILE ]; then
                return 0
        fi
        $DAEMON &
        echo "$!" > $PIDFILE
        return 1
}

# Return 0, process not started.
# Return 1, kill process
do_stop()
{
        if [ ! -f $PIDFILE ]; then
                return 0
        fi
        kill -9 `cat $PIDFILE`
        rm $PIDFILE
        return 1
}

case "$1" in
  start)
        do_start
        case "$?" in
                0) echo "$NAME already started." ;;
                1) echo "Started $NAME." ;;
        esac
        ;;
  stop)
        do_stop
        case "$?" in
                0) echo "$NAME has not started." ;;
                1) echo "Killed $NAME." ;;
        esac
        ;;

  status)
        if [ ! -r "$PIDFILE" ]; then
                echo "$NAME is not running."
                exit 3
        fi
        if read pid < "$PIDFILE" && ps -p "$pid" > /dev/null 2>&1; then
                echo "$NAME is running."
                exit 0
        else
                echo "$NAME is not running but $PIDFILE exists."
                exit 1
        fi
        ;;
  *)
        N=/etc/init.d/$NAME
        echo "Usage: $N {start|stop|status}" >&2
        exit 1
        ;;
esac

exit 0
(Note: I tried to make it as generic as possible so all distributions will work. This is why it isn’t using Ubuntu-specific commands).
Last of all, add it to the bootup script. The below command is specific debian-distributions:
# Add cpu_temp to startup sequence.

> sudo update-rc.d /etc/init.d/cpu_temp defaults
That should be it! When the computer reboots, it will automatically run the CPU temperature in prompt.
One final note: make sure that all the scripts are executable.
How do you include another file like #include in C code?
There are three ways to include another file in Perl. Each have their distinction edge, but all gets the job done.
Method #1: Use the command ‘use’.
Sample code:
# Include the file "sample_include.pm"

use sample_include;
Comment:
Note that the include file has to be Perl module (*.pm). For further reading on how to use command ‘use’, refer to the perldocs either through the command line or website:
perldoc -f use
What the above code does is load sample_include.pm as part of the file. Generally, this will contain some sort of package and subroutines, which can be called explicitly such as <package name>::<subroutine>. See example below:
# sample_include.pm

package sample_include;

sub test {

print "This is a subroutine";

}

1; # Needed here to return true when loading PM files.
# Sample program

use sample_include;

sample_include::test()  # calls subroutine test.
There are methods to allow nonexplicit package (also known as barewords such as test()). See Exporter and Classes for more info.
Method #2: Use the command ‘require’.
Sample code:
# Include the file "sample_include.pm"

require sample_include;
Comment:
Like the first method, this also needs to be a Perl module. For further reading on how to use this command, type the following or go here:
perldoc -f require
What’s the difference between require and use?
Technically, the use command uses require when loading the module. Use does more work, trying to import subroutines or variables into the main file. The below two section are equivalent:
# Load in sample_file.pm

use sample_file;
# Load in sample_file.pm

BEGIN {

require sample_file;

sample_file->import( LIST );

}
Method #3: Use the command ‘do’.
Sample code:
# Include the file "sample_include.pm"

do "sample_include.pm"
Comment:
Unlike the other two commands, ‘do’ does not require to be a Perl Module. However, it should be a Perl file, since it will execute the contents of the file. See here for more details.
One interesting note, the do mechanism can only be called once. The other mechanisms work if you include them multiple times in a .pm file, but the ‘do’ in a Perl module can only be called once (whether it’s intentional or not). Example:
#sample_include.pm

do "another_file.pl";

1
#another_include.pm

package another_include;

use sample_include;

&func();

1
# main file

use sample_include;

use another_include;

&func();
# another_file.pl

sub func {

print "Who will run this function?";

}
The main file will execute sample_include.pm first (before another_include). Do will execute and associate func to be with main::func(). However, when another_include.pm tries to run sample_include.pm, it ends up unable to work (for reasons unknown). As a result, when sample_include tries to run &func(), it will return an error.
The proper method is to make sure that ‘do’ command will only run once anywhere when including the files. Otherwise, some functions will not work as intended.
>perl main.pl

Undefined subrounte &another_include::func called at another_include.pm line 4.
For more reference (and a better tutorial), here’s another article that explains more in detail about includes: Including files.
How do you read an entire file into a string?
Method #1: Use the kernel system call.
Sample code:
# Read entire file into string:

$output = `cat sample_file.txt`;
Comment:
This is the simpliest method, but NOT recommended. There are many issues with this, such as platform-dependent, and bad programming practice (launching a shell to get the output).
- Windows won’t be able to run this.
- It launches a new shell (bad programming practice) to get the output.
Method #2: Open the file through Perl.
Sample code:
# Read entire file into string:

open(FILE, "sample_file.txt") or die "Error: no file found.";

$output = do {local $/; <FILE> };
Comment:
* Recommended.
This is the recommended method. The reason this works is due to the special character $/ defined by Perl.
Normally reading <FILE> returns a line from the file. This is because <FILE> is read until it hits the delimiter defined by $/, which is “\n” by default. By creating a local $/ in the do loop, it reads until it hits at the end of the file, since $/ is undefined.
Examples:
# $/ = "\n", reads until end of line.

$output = <FILE>;
# $/ = "c", reads until it hits 'c'.

$output = do {local $/="c"; <FILE> };
# $/ is undefined, reads until eof.

$output = do {local $/=; <FILE> };
Method #3: Use File::Slurp.
Sample code:
# Read entire file into string:

use File::Slurp qa( slurp );

$output = slurp("sample_file.txt");
Comment:
* Highest performance.
This relies on File::Slurp Perl package to read efficiently an entire file. Though one could use read_file() defined by Slurp, it’s better to use slurp() because it will be supported in Perl 6 as part of the standard package.
Since it isn’t a standard function, File::Slurp will have to be installed on every machine that use this code. Because of this issue, method 2 is preferred. However, if performance is crucial in the program, then use this method.
Install this module is very easy. Download through the link, extract and run the commands (as root):
$ perl Makefile.PL

$ make

$ make install
Nowadays linux distrubutions have easy package installers. Glancing at Ubuntu, I found this command to install File::Slurp:
apt-get install libfile-policy-perl
Final comment:
The first two methods are NOT a good method to read really large files. Some claim that the 3rd method can handle large files efficiently, though through some experimentation I haven’t reproduced the desired result. Ideally it make sense: Perl’s I/O operation is not as efficient, and Perl::Slurp tries to bypass this by using sysread() command.
Running a quick test, I found the performance between these three methods when reading a 100 MB text file:
Method #1: 1.450 seconds
Method #2: 0.754 seconds
Method #3: 0.744 seconds
This was too fast for checking memory usage, but reading a 500 MB file showed that the program used up to 70% of my memory resources of a 1.25 GB RAM laptop.
For more details on this topic, this is a decent article about trying to increase performance for large files. Though out of date on some issues (File::Slurp implementation has improved since this article was written), it has some good data.
Addendum added Aug 8th, 2009 (3rd method and expanding on final comment).
